DIY Bathroom Elegance: How to Create a High-End Look Without the High-End Price Tag


Have you ever scrolled through Pinterest or flipped through a home magazine and sighed at the luxury bathrooms with marble finishes, designer lighting, and gold-dipped everything? The good news is: you don’t need a designer budget to create a bathroom that feels like a five-star spa. With the right DIY touches and carefully chosen accessories, you can elevate your bathroom into a glamorous, high-end retreat—all without calling in a contractor.

Let’s talk about how to transform your bathroom into an elegant escape using budget-friendly decor and easy upgrades.


1. Start With a Sophisticated Color Palette

The base of any luxurious-looking bathroom is the color scheme. Think rich neutrals like:

  • Soft greys and off-whites
  • Matte black and gold accents
  • Deep navy or emerald green with brass hardware

DIY Tip: Repaint your bathroom vanity with a semi-gloss deep navy or charcoal. Add gold handles for instant elegance.


2. Add Peel-and-Stick Wallpaper or Tile

Yes, you read that right. Peel-and-stick wallpaper and tile have come a long way. You can find marble, herringbone, and even faux-stone designs that mimic high-end finishes.

DIY Tip: Use peel-and-stick marble tile as a backsplash behind the sink or line the back wall for a dramatic effect. It’s renter-friendly and removable!


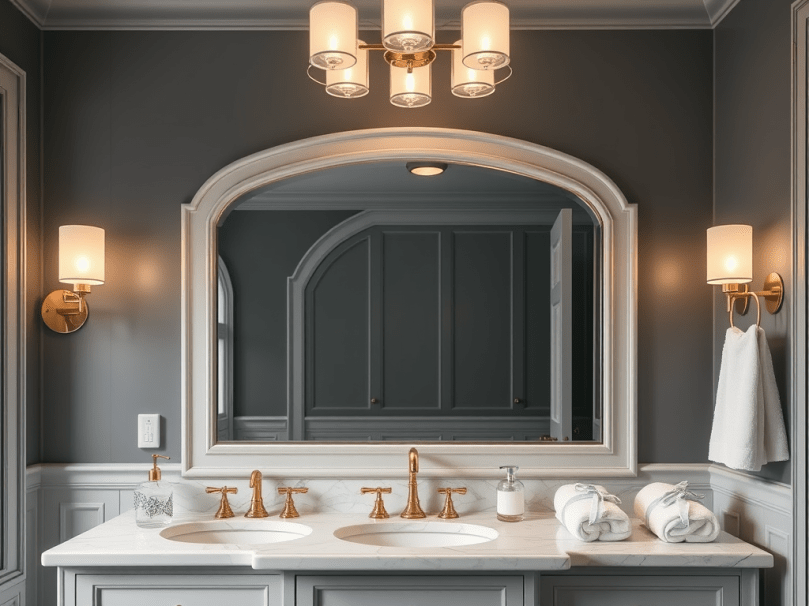
3. Upgrade Your Mirror

Framed mirrors scream boutique hotel vibes. If you have a plain builder-grade mirror, add a DIY frame using wood trim and paint. Or, replace it with a chic arched mirror in a black or gold frame.

DIY Tip: Check thrift stores for vintage mirrors and give them a quick refresh with metallic spray paint.


4. Swap Out Lighting Fixtures

A glamorous light fixture can instantly elevate your space. Think globe sconces, crystal chandeliers, or sleek LED mirrors.

DIY Tip: Replacing a light fixture is a doable weekend project. Choose brushed brass or matte black finishes to stay on-trend.


5. Incorporate Elegant Accessories

Accessories are where you can really play up the “luxe” factor.

Must-Have Elegant Accessories:

  • Glass or crystal soap dispensers
  • Folded white towels tied with ribbon or placed in a woven basket
  • A small gold tray for candles and perfume bottles
  • A decorative waste bin and tissue box cover in coordinating finishes

DIY Tip: Use dollar store trays and spray them gold for a glam touch!


6. Add Art That Looks Expensive

Bathroom art can often feel like an afterthought, but it’s a powerful way to personalize and elevate the space.

DIY Tip: Frame minimalist line art prints or black-and-white photography. Add a floating shelf to display candles, art, or small plants.


7. Use Plush Textiles

One of the easiest ways to upgrade your bathroom is to bring in better textiles:

  • Fluffy white bath mats
  • Monogrammed hand towels
  • A linen or waffle-weave shower curtain

DIY Tip: Layer rugs—use a non-slip rug underneath a woven one for added depth and style.


8. Create a Spa Vibe With Scents

High-end bathrooms always smell amazing. Incorporate essential oil diffusers, reed diffusers, or candles.

DIY Tip: Make your own DIY lavender sachets or use a pretty glass jar to store bath salts with eucalyptus sprigs.


Final Thoughts

Creating a luxurious bathroom on a budget is totally doable with a little creativity and intentional styling. By focusing on color, texture, and subtle upgrades, you can craft a DIY bathroom space that feels serene, sophisticated, and oh-so-elegant. It’s all about thoughtful choices that mimic the luxury look—without the luxury price tag.


DIY Your Kitchen on a Budget: The Most Cost-Effective Ways to Transform Your Space


If your kitchen feels outdated but your bank account says “not right now,” don’t worry—you’re not alone. The good news? You can DIY your kitchen on a budget and still end up with a fresh, functional, and beautiful space. Whether you’re prepping for a home sale or just want to love your kitchen again, here’s how to do it in the most cost-effective way possible—with product ideas and advice to make it even easier.


1. Start with a Plan—Not a Purchase

Advice: Take photos of your current kitchen, pin some inspiration on Pinterest, and write down your top three goals.

Tools That Help:


2. Paint: The Ultimate Budget Hero

Advice: Choose a durable semi-gloss or satin finish for kitchens. Don’t skip cleaning and sanding if you’re painting cabinets.

Recommended Products:


3. Update Hardware for Instant Impact

Advice: Measure your current hole spacing before buying new hardware to avoid drilling new holes.

Affordable Finds:


4. Use Peel-and-Stick Everything

Advice: Clean surfaces thoroughly before applying, and use a smoothing tool to prevent bubbles.

Recommended Products:


5. Reface Instead of Replace

Advice: Refacing is ideal if your cabinet boxes are still solid. You can save thousands by only replacing doors or adding veneer.

Sources:


6. Light It Right

Advice: Good lighting can make even older finishes look better. Swap outdated fixtures with modern ones or add lighting under cabinets.

Budget Options:


7. Use Open Shelving Strategically

Advice: Start by removing just one or two cabinet doors before committing. Keep open shelves styled and uncluttered.

DIY Supplies:


8. Declutter + Decorate With Purpose

Advice: Edit your kitchen items—remove duplicates and donate what you don’t use. Use decorative storage to create function + beauty.

Ideas:


9. Shop Secondhand and Repurpose

Advice: Always measure first and bring a tape measure when thrifting. Look beyond color—focus on shape and function (you can always paint it!).

Where to Shop:


10. Set a Realistic Budget—and Stick to It

Advice: Budget your project in categories: paint, lighting, hardware, décor, etc. Track what you’re spending weekly.

Tool That Help:

  • Apps: Try Google Sheets or budgeting apps like Goodbudget or EveryDollar.

Final Thoughts

You don’t need a massive renovation budget to love your kitchen again. With the right approach, affordable tools, and a dash of creativity, your DIY dream kitchen is totally within reach. Remember—it’s not about having the fanciest space; it’s about making it yours.


DIY Your Living Room: Ideas, Tips, and Where to Begin to Create the Living Room of Your Dreams


Your living room is more than just a space to relax—it’s where life happens. Whether it’s cozy movie nights, weekend lounging, or entertaining guests, your living room sets the tone for your home. But what if it doesn’t feel quite right? Maybe the colors feel outdated, the layout feels awkward, or you simply crave a space that reflects your personality and lifestyle.

The good news? You don’t need a huge budget or a full renovation crew to breathe new life into your living room. With a little creativity, a few key tools, and the right mindset, you can DIY your way to a dream-worthy space that’s stylish, functional, and totally you.

Here’s how to begin—and a few clever ideas and tricks to guide you along the way.


Step 1: Start with a Vision

Before picking up a paintbrush or rearranging furniture, think about how you want the space to feel. Cozy and warm? Bright and airy? Bold and dramatic?

Create a mood board using Pinterest or save images from your favorite interior design blogs and magazines. Focus on the feelings you want your space to evoke—calm, creativity, energy, or comfort.

Tip: Think in terms of function and vibe. Who uses this space most? What do you do in it? A great living room supports both your lifestyle and your style.


Step 2: Declutter and Redefine

A fresh start begins with a clean slate.

  • Remove unnecessary furniture, old décor, and anything that no longer fits your lifestyle.
  • Evaluate what’s working and what isn’t—then make room for things that will.
  • Donate or repurpose items that don’t serve you anymore.

Trick: Snap a photo of your living room as-is. Sometimes seeing it through a different lens helps you spot cluttered corners or dated pieces you’ve gotten used to.


Step 3: Choose a Color Palette (+ Current Trend Highlight)

A DIY-friendly transformation often starts with paint. Whether you’re painting the walls, an accent wall, or even furniture, color changes everything.

  • Neutral palettes make a space feel calm and timeless.
  • Bold hues or moody tones add personality and drama.
  • Consider peel-and-stick wallpaper or paintable wall panels for texture.

Pro Tip: Test paint samples in various areas of the room and observe how they look throughout the day under different lighting.


Style Spotlight: Soft Minimalism

One of today’s most popular and easy-to-DIY decor styles is Soft Minimalism. It blends clean, uncluttered lines with cozy textures and organic tones—perfect for creating a serene and stylish living room. The palette typically includes whites, beiges, soft taupes, and warm wood tones.

Here’s how to bring Soft Minimalism into your living room:

  • Linen or cotton curtains in a creamy off-white tone
    Try: IKEA LILL Sheer Curtains or West Elm Belgian Flax Linen Drapes
  • Bouclé or textured throw pillows for visual interest
    Try: Threshold™ Bouclé Throw Pillow from Target
  • A light wood coffee table or sideboard
    Try: Project 62™ Natural Wood Coffee Table from Target or IKEA’s HAVSTA series
  • Minimalist wall art with soft, abstract lines
    Try: Etsy downloadable prints or Desenio’s neutral art prints

This look is calming, modern, and flexible enough to evolve with the seasons or your mood.


Step 4: Rearrange What You Already Own

Sometimes the biggest change comes from a fresh layout.

  • Float your furniture away from the walls to make the room feel more open.
  • Group seating for conversation and flow.
  • Use an area rug to define the space and anchor the furniture.

Trick: Use painter’s tape to outline furniture placement before moving heavy items. It saves your back—and your floors.


Step 5: Add Character with DIY Decor

This is where your creativity shines.

  • Create your own art using canvas, stencils, or digital downloads.
  • Build simple open shelving with floating brackets to display books, plants, and mementos.
  • Refinish old furniture with chalk paint, stain, or new knobs and pulls.
  • Design a gallery wall with black-and-white photos, framed textiles, or travel finds.

Idea: Want a big change with low commitment? Try a removable wallpaper accent wall or wood wall molding using lightweight trim.


Step 6: Incorporate Layers and Texture

A dreamy living room appeals to your senses—not just your eyes.

  • Layer rugs (like jute under a softer wool rug) for depth.
  • Add cozy pillows and throws in a mix of materials—cotton, faux fur, velvet.
  • Bring in greenery with real or faux plants.
  • Use wood, stone, and ceramic to add natural texture.

Tip: Mix three different textures in each zone of your room—like wood + knit + metal for instant warmth and contrast.


Step 7: Light It Up

Lighting can make or break your DIY makeover.

  • Mix ambient (overhead), task (lamps), and accent (candles or LED strips) lighting.
  • Use warm white bulbs (2700K–3000K) for a cozy vibe.
  • Consider upgrading builder-grade light fixtures with a DIY pendant or sconce kit.

Easy DIY Upgrade: Use matte black spray paint on old brass lamp bases for an instant modern look!


Step 8: Finish with Meaningful Touches

Make your living room feel like home with intentional accents:

  • Display family photos in matching or coordinated frames.
  • Use a tray on your coffee table to corral candles, coasters, and books.
  • Rotate in seasonal decor (think: cozy in fall, fresh in spring).
  • Showcase items that tell your story—books, artwork, souvenirs.

Remember: Your living room should reflect who you are—not just what’s trending.


Where to Shop for Budget-Friendly DIY Decor:

  • Target – Affordable furniture and trendy textiles
  • IKEA – Scandinavian basics perfect for Soft Minimalism
  • Facebook Marketplace – Find vintage treasures and flip-worthy furniture
  • Etsy – Unique art prints, pillow covers, and handmade accessories
  • Amazon – Budget finds, lighting upgrades, and peel-and-stick options
  • Home Depot / Lowe’s – Paint, tools, and wall paneling for DIY upgrades

Final Thoughts

Creating your dream living room isn’t about perfection—it’s about intention. When you design with your heart and hands, you craft a space that reflects your values, taste, and creativity.

Start small. Be playful. And most importantly, enjoy the process.


DIY Your Entryway: Create a Warm Welcome on Any Budget


Your entryway is the first impression guests have of your home — and the last one you see before walking out the door each day. Why not make it functional, stylish, and a true reflection of your personality? You don’t need a massive foyer or a big budget to DIY an entryway that feels warm, organized, and beautiful.

Whether you’re working with a narrow hallway, a small nook, or a full-blown mudroom, here are some creative and budget-friendly ideas to transform your entryway into a space that welcomes you home in style.


1. Start with a Statement Piece

Your entryway sets the tone for the rest of your home, so start with one statement item — it could be a mirror, a bold piece of wall art, or a bench with personality.

  • DIY Tip: Try thrift stores or flea markets for a vintage mirror and give it a fresh coat of paint to match your style.
  • Style Idea: A round mirror paired with a narrow console table instantly adds elegance and depth, even in tight spaces.

2. Create Functional Storage

We all need a spot to drop keys, bags, and shoes — but that doesn’t mean it has to look messy. Incorporate clever storage that works with your lifestyle.

  • Wall hooks: Install a row of sturdy, stylish hooks to hang coats, hats, or handbags.
  • Shoe solutions: Use a small shoe rack or repurpose a narrow bookshelf with baskets to hide clutter.
  • Drop zone: Add a tray or bowl on a table for keys and wallets.

3. Add Seating

Even a small bench or stool adds comfort and convenience. It’s perfect for sitting down to put on shoes — and adds a touch of hospitality.

  • DIY Project: Build a simple wooden bench or give an old one new life with fresh paint and a cushion.
  • Space-saving tip: Try a bench with hidden storage underneath.

4. Incorporate Personality with Decor

This is where your entryway really comes to life.

  • Wall gallery: Hang family photos, inspirational quotes, or DIY art.
  • Plants: Add a small potted plant or a vase of seasonal branches for a natural touch.
  • Rugs: A rug or runner defines the space and keeps dirt from tracking in. Choose a washable rug for easy cleanup.

5. Light It Up

If your entryway doesn’t get much natural light, add your own glow. A lamp on a console table, battery-operated sconces, or LED puck lights can brighten things up without any wiring.


6. DIY Entryway Checklist

Here’s a quick list of items you can mix and match to fit your space:

  • Mirror or wall art
  • Console table or narrow shelf
  • Hooks for coats and bags
  • Small rug or mat
  • Bench or stool
  • Key tray or catchall
  • Baskets or bins for storage
  • Decorative items (plants, candles, frames)
  • Lighting (lamp, sconces, or lanterns)

Final Thoughts

You don’t need a complete renovation to turn your entryway into a charming, functional space. With just a few thoughtful DIY touches, you can create an entryway that says “welcome home” every time you walk through the door.

Whether your style is rustic farmhouse, modern minimalist, or cozy boho, there’s a DIY entryway project that can bring your vision to life — all without breaking the bank.


DIY Your Home: Where to Begin and How to Thrive Without Getting Overwhelmed


So, you purchased a home. You have all these ideas regarding how you would like to improve your home. Where do you begin? How do you prioritize? What expectations should you have? Where do you forget expectations and go with the flow?

Welcome to the incredible—and sometimes chaotic—world of homeownership. It’s equal parts exciting and overwhelming, especially when your mind is racing with ideas: painting walls, updating the kitchen, refreshing floors, or creating the perfect outdoor space. But DIYing your home isn’t just about watching tutorials and grabbing supplies from your local home store—it’s about balance, planning, and allowing space for flexibility.

Start with a Vision, Not a To-Do List

Before you run out and buy a cartload of paint samples and wood stain, take a breath. What do you want your home to feel like? Cozy and rustic? Sleek and modern? Boho and relaxed? Defining the vibe and general direction of your decor will help you make consistent decisions throughout your DIY journey.

Create a mood board—either physical or digital—with color palettes, room inspirations, and product ideas. Pinterest is a great place to gather and organize thoughts. This vision board becomes your DIY compass.

Prioritize Projects That Impact Daily Living

The temptation to start with the most fun project is real. But smart DIYers know that function should come before flair. Ask yourself:

  • What space do I use the most?
  • What’s currently not working in my home?
  • Are there safety issues that need to be addressed?

Maybe the kitchen layout is awkward, or you desperately need storage in the hallway. Tackling functional improvements first gives you a smoother daily life while also building confidence in your DIY abilities.

Set Realistic Expectations

DIY doesn’t mean “quick fix.” It means being resourceful, creative, and often learning as you go. Give yourself permission to mess up. Projects might take longer than you expected. You’ll likely need to redo something—or maybe rethink it entirely. That’s okay.

If you work full-time or have a family, try this: focus on one area or project per month. It’s a manageable pace and gives you time to enjoy the results before rushing to the next thing.

Know When to Ditch the Plan

Here’s where the fun really begins—those moments where spontaneity leads to brilliant ideas. Maybe your plan for an all-white living room morphs into a cozy, moody space because you found a vintage navy blue couch at a thrift store. That’s the beauty of DIY: your home grows and evolves with you.

Allow flexibility in your schedule and your design. Some of the most unique homes aren’t the ones that followed a strict blueprint—they’re the ones where personality showed up unexpectedly.

DIY Doesn’t Mean Doing It Alone

One of the biggest myths in home improvement is that DIY means you have to do it yourself. In reality, DIY is about choosing what you can and want to do yourself and knowing when to bring in help. Whether it’s watching YouTube videos, asking a friend for a hand, or hiring someone for the tricky parts, leaning on others doesn’t take away from the DIY spirit—it just makes it more sustainable.

Final Thoughts: Enjoy the Journey

DIYing your home is a marathon, not a sprint. There will be late-night painting sessions, moments of doubt, and unexpected costs. But there will also be incredible pride when you sit on a bench you built yourself or see a room transform because you brought your ideas to life.

Give yourself grace. Be proud of every small victory. And most importantly, make your home a reflection of you—flaws, flair, and all.


Want to stay inspired on your DIY journey? Check out our daily blog for more inspiration to help you tackle your next project. www.discoveringlifellc.com | Your home, your story, your style.